Beauty Basics - Rouge
När du har lagt din bas har du oftast samma färg över hela ansiktet, vilket ibland kan ge ett lite platt intryck. Med ett rouge lyfter du fram kinderna och ger ansiktet mer djup. Rougeapplicering är något man behöver öva på innan man får till det så där nyponfräscht snyggt varje gång, men övning ger färdighet! Här tänkte jag visa några tekniker, produkter och verktyg man kan använda sig av när man applicerar rouge.
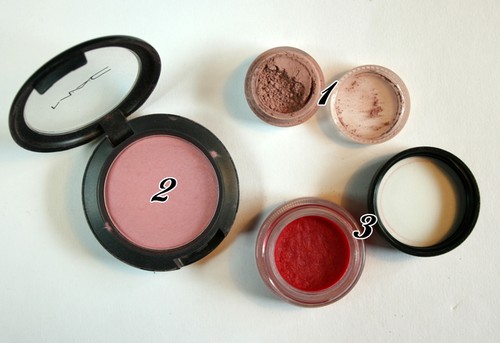
De rouge jag har i min samling är antingen lösa eller pressade mineralrouge, pressade traditionella rouge och ett gelrouge. Jag tänkte berätta lite mer om mina favoriter inom varje kategori.
Lösa mineralrouge (# 1 på bilden, best friends från Everyday Minerals) kan vara lite svåra att få kläm på i början när det kommer till applicering eftersom det är lätt att plocka upp för mycket på borsten. De ger däremot ett jättefint resultat när man väl får kläm på dom, och ett rougeprov från EM kostar nästan ingentig men räcker väldigt väldigt länge eftersom man får en full 5-gramsburk. Ett bra budgettips med andra ord!
Pressade rouge (#2 på bilden, dame från MAC) är de jag har flest av i min samling eftersom de finns i så många färger och finishes, och dessutom är både lätta att jobba med och ta med sig.
Ett gelrouge (#3 på bilden, just a pinch från MAC) eller krämrouge ger ett naturligt och lätt rosat resultat. Det appliceras med fördel med fingrarna, men min favoritmetod är att applicera med en duofiberborste, #188 från MAC. Gelrouge kan även användas på läpparna som en lätt och skir läppfärg.
Verktyg

En bra borste för att applicera rouge är nästan lika viktigt som rätt teknik för att det ska se snyggt ut. En bra borste ger ett jämnt resultat utan några skarpa kanter eller ojämn pigmentering.
Har du ett väldigt högpigmenterat rouge är en duofiberborste (#1 på bilden, #188 från MAC) ett jättebra verktyg. Eftersom de stråna du plockar upp rouget med är av syntet och de sitter hyfsat glest ifrån varandra blir appliceringen lätt och skir utan att det blir flammigt eller fläckigt.
En klassisk, platt oval rougeborste (#2 på bilden, #116 från MAC) gör det lätt som en plätt att applicera rouge. Den är tät nog för att både plocka upp och ge ifrån sig mycket pigment, samtidigt som den är fluffig nog att ge en jämn och fin applicering utan några skarpa linjer.
En fluffig snedskuren rouge/contouringborste (#3 på bilden, #168 från MAC) föredrar många framför en klassisk rougeborste tack vare att det är så lätt att följa kindbenens form med den snedskurna kanten. Dessutom fungerar den utmärkt för att applicera både highlighter och contouring med, så den här borsten är bra för dig som vill ha många borstar i ett!
En annan multitaskingborste är en s.k. "mop" brush (#4 på bilden, #109 från MAC). Den här borsten är speciellt bra till lösa rouge eftersom man kan buffa in produkten så bra i huden med den. Dessutom fungerar den finfint till att applicera både foundation och contouring med!
Appliceringstekniker
Det kan vara lite knepigt att veta var man ska applicera rouget för den effekt man vill uppnå, och utan att se ut som en översminkad docka i ansiktet. Tricket är att vara lätt på handen och hellre applicera flera tunna lager än ett tjockt, det är alltid lättare att lägga till än att ta bort! De här tre appliceringsteknikerna brukar jag använda mig av för att uppnå olika resultat.
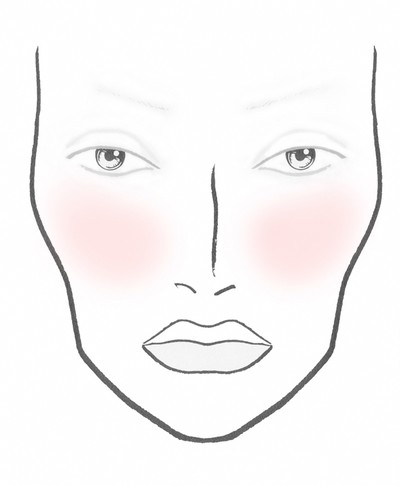
För att få till den här appliceringen brukar jag lägga borsten mitt på kinden, och sen arbeta in rouget utåt med cirkulerande rörelser. På så sätt undviker du skarpa kanter.
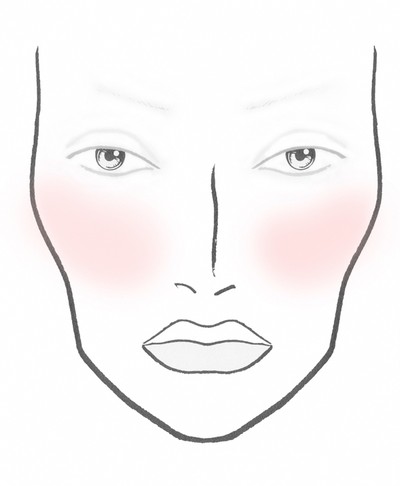
För att få till den här appliceringen brukar jag lägga borsten mitt på kinden, och sedan svepa den lätt uppåt på själva kindbenet (varken ovanpå eller under kindbenet, utan på själva "kanten"). På så sätt får du mest färg på själva kinden, och mindre upp mot tinningen.
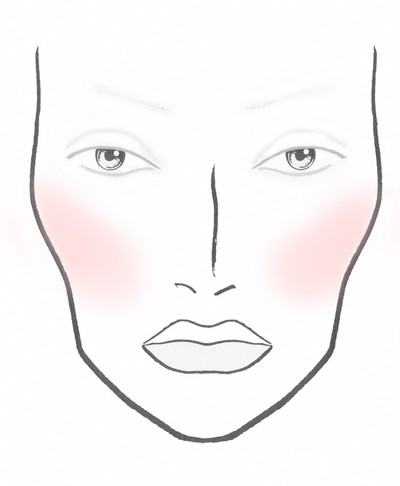
För att få till den här appliceringen brukar jag lägga borsten precis under kindbenets högsta punkt, närmast hårfästet, och svepa den neråt i linje med kindbenets kant. På så sätt får du mest djup där kindbenen framträder mest naturligt, och ingen skarp kant när du närmar dig kinden.
Tips och Tricks
- Hittar du inte den perfekta rosa nyansen? Kolla bland ögonskuggssortimentet! Samma sak gäller tvärt om; rouge går även bra att använda som ögonskugga.
- Ett skimrigt rouge ger lyster och framhäver kindbenen. Men tänk på att skimmer även framhäver stora porer och fina linjer.
- Svårt att få till rouge snyggt utan skarpa linjer? Buffa in rouget med en kabukiborste så smälter det in som en dröm!
- Se till att fixera din bas med puder innan du applicerar rouge, annars finns risken för att rouget sugs upp av din foundation och resultatet blir flammigt.
Products
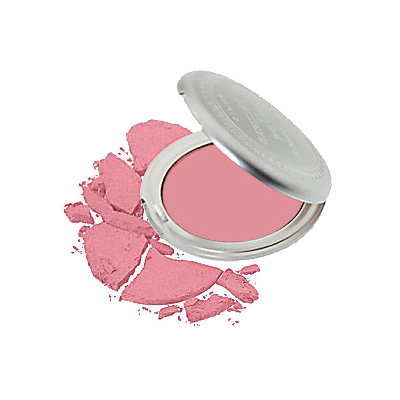
Loose mineral blushes (#1 in the first picture of the entry, best friends from Everyday Minerals) can be a bit of a hassle to apply in the beginning since it's easy to pick up too much product on the brush. They will look great when you've learned how to handle them, though, and a blush sample from EM cost almost nothing and lasts for a long time. A good choice if you're on a budget!
Pressed blushes (#2 in the first picture of the entry, dame from MAC) are the kind I prefer to use since they come in so many shades and finishes, plus that they are easy to work with and to take with you.
A gel blush (#3 in the first picture of the entry, just a pinch from MAC) or a creme blush gives a neutral and lightly flushed result. You can apply these with your fingers, but I prefer to use a duo fibre brush, #188 from MAC. Gel blushes can also be used on the lips as a light and sheer lip colour.
Tools
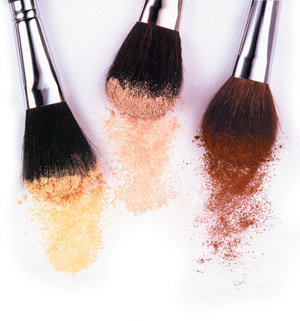
If you have a very highly pigmented blush, a duo fibre brush (#1 in the second picture of the entry, #188 from MAC) is a great tool to use. Since the bristles you pickt up the blush with are synthetic and sits quite wide apart, the application is light and sheer without getting blotchy.
A classic, flat domed blush brush (#2 in the second picture of the entry, #116 from MAC) makes it really easy to apply blush. It's dense enough to both pick up and deposit a lot of pigment, and fluffy enouth to provide a nice and even application without any sharp edges.
A fluffy, angled blush/contouring brush (#3 in the second picture of the entry, #168 from MAC) is what many prefer over a classic blush brush since it makes it so easy to follow the shape of the cheek bone, thanks to the angle. Plus, it also works great for applying both highlighter and contouring with, so this is a great multitasking brush!
Another multi tasking brush is a so called mop brush (#4 in the second picture of the entry, #109 from MAC). This brush is especially good for loose blushes since you can buff the product into the skin with it. It's also a favourite of mine for applying foundation and contouring!
Application Techniques
To apply blush in this way, I usually put the brush on the middle of the apple of the cheek, and then blend the blush outwards using circular motions. By doing this, you're avoiding any sharp lines.
To apply blush in this way, I usually put the brush on the middle of the apple of the cheek, and then I sweep the brush lightly upwards on the cheekbone (not on top of the cheekbone or under the cheekbone, but on the actual cheek bone). By that way, you'll get more colour on the cheek, and less upwards the temple.
To apply blush in this way, I usually put the brush right under the highest point of the cheekbone, i.e. closest to the hairline, and sweep it downwards along the line of the cheekbone. By doing that, you'll get more depth where the cheekbone is at it's highest naturally, and no sharp line when you get closer to the cheek.
Tips and Tricks
- Can't find the perfect pink shade? Look among the eyeshadows! The same thing goes the other way around; blush also works great as an eyeshadow.
- A shimmery blush gives glow to the skin and enhances your cheekbones. Do consider that shimmer also makes enlarged pores and fine lines appear more, though.
- Do you find it hard to get a nice blush application without any harsh lines? Buff the blush with a kabuki brush and it will blend in flawlessly!
- Make sure to fix your base with a powder before applying your blush, or your blush might be absorbed by the foundation, resulting in blotchyness.
Superbra inlägg! Sånt här gillar jag! =) Om nästa handlar om hur man highlightar så blir jag jätteglad ;)
du är grym!
=P hej, jag undrar ngra saker..
* Har du några swatcher på dina rouge eller kommer att göra det? skulle vara kul att se. ^^ (som du gjorde med ögonskuggorna & läpprodukterna),
* Har du tips om ett kvällsrouge (shimrigt/glittrigt) från Mac? Vilken nyans kvittar förutom brunt. =P har snäppet ljusare hud än din.
:S
^^
Linda: Jajamensan =)
Lollo: Tack, vad glad jag blir!
Lina: Swatches kan jag ordna =) Har ju inte så många rouge än dock så är därför jag inte har gjort det än, Karlasugar har swatchat alla permanenta MAC-rouge här annars: http://karlasugar.net/2010/01/mac-blush-recap/
Angående kvällsrouge - vill du ha ett rosa så testa mineralizerouget Dainty, det ger ett dövackert glow till kinderna! Ett mer koralligt, superfint och skimrigt MAC-rouge är Peachykeen.

-
Purity är en skönhetsblogg som har funnits på nätet sedan hösten 2008. Jag som driver bloggen heter Sanna, är 23 år och bor i Stockholm. Läs mer här!


Purity is a privately owned beauty blog. The opinion and rating of products that occurs on this blog are my own views and cannot be affected. Read more about my policies here.