Mavala Go red


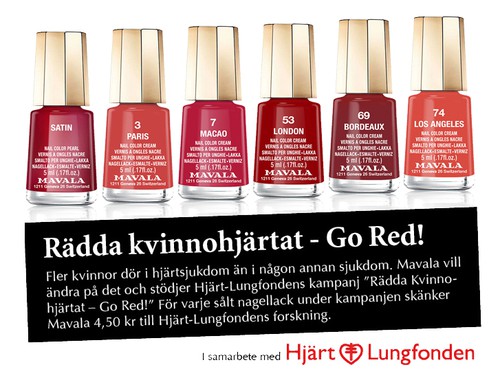
Under Mars månad drar Hjärt-Lungfondens kampanj för Rädda kvinnohjärtat - Go Red - igång. I samband med detta nylanserar nagellacksmärket Mavala sex av sina permanenta nyanser av röda lack i miniflaska under kampanjnamnet Mavala Go Red, där 4,50 kr per sålt lack går till Hjärt-Lungfondens forskning. Jag som pluggar till sjuksköterska tycker det är ett superbra initiativ, då Hjärt-Lungfonden bekostar merparten av den oberoende forskningen kring hjärt-kärlsjukdom i Sverige.

De nyanser som nylanseras är Satin, Paris, Macao, London, Bordeaux och Los Angeles. Jag är sugen på att spana in klassiskt klarröda jellylacket Los Angeles, det ser helt lovely ut på Nailtastics bilder! Mavalas lack kostar ca 45 kr/st och rymmer 5 ml.


In English: Nail polish brand Mavala launches a campaign in Sweden during March in collaboration with the Swedish Heart-Lung foundation. 6 red polishes are being re-launched under the name Mavala Go Red, and 10% of the profits from each sold polish is donated to the Heart-Lung foundation's research.


På nagelkurs hos Scratch nails


Igår morse var jag på nagelkurs hos svenska nagellacksmärket Scratch nails. Kursen höll för en liten skara bloggare, bland annat var härliga P'ssion-Emelie, Beleza-Tina och TotalBeauty-Carina på plats, i Scratch nails lokaler i Stockholm.


Förmiddagen startade med en smaskig frukostbuffé, och sen berättade Scratch nails VD och grundare Marie Houston lite mer om märket och dess historia.


Tea, fruit salad with yoghurt and croassaints - yum!


All Scratch nails shades are personally picked by Marie


1985 öppnade den första Scratch nails-salongen i Stockholm, och 1992 utvecklade de sina första egna nagellack - redan då fria från toulene, DBP och formaldehyd (3-free). Numera finns Scratch nails vårdande nagelsortiment representerat i 55 Åhlénsbutiker runt om i Sverige, och de färgade lacken finns att köpa på salonger samt via deras webshop.


Själva kursen leddes av Scratch nails utbildningsansvarige, Lina Nyberg, som introducerade oss till receptet till en lyckad hemmamanikyr med hjälp av Scratch nails basmanikyrkit. Kitet innehåller en crystal stone nagelfil, en nagelpolerare, aceton-och oljefri nagellacksremover, nageloljan nail food samt ett ofärgat lack. 

Precis som med hudvård så är nyckeln till fina och friska naglar en god nagelvård med peeling och återfuktning. Det är lite pyssel, men är enkelt att göra hemma i några få enkla steg och tar inte så lång tid som man kan tro.


Manikyr kit bas (395 SEK)


1. Första steget i en manikyr är att ta bort gammalt lack med remover, helst utan aceton och olja. Aceton är ett väldigt starkt lösningsmedel som torkar ut och sliter på naglarna, och har man olja i removern så kapslar det in lösningsmedel mot nageln vilket sliter och kan ge missfärgade naglar. Remover och olja för sig, med andra ord!

2. Forma och försegla nagelns kant med hjälp av en finkornig fil, gärna i glas eller kristall då dessa slipar nageln istället för att slita ner den som en sandpappersfil gör, och de håller i princip för evigt. Med en finkornig fil kan du även fila ner små förhårdnader runt nageln och på fingrarna utan att skada huden.

3. En nagelpolerare jämnar ut nagelytan, ger glans och ger en bra bas för ditt nagellack att fästa på. En nagelpolerare består ofta av 3 sidor - 1 för att jämna ut nagelytan (används max 3 ggr/år!), och 2 för att polera fram en glans på nageln.

4. Dags för nagelolja! Precis som huden så behöver nageln fukt för att behålla sin naturliga spänst och elasticitet. En nagelolja håller dessutom dina nagelband återfuktade. Skillnaden mellan en nagelolja och t.ex. en matolja är att nageloljan har mindre molekyler och tränger därmed lättare ner i nagelns undre skikt. 1-2 droppar per hand räcker gott och väl till alla 5 naglar, och oljan kan med fördel poleras in i nageln med hjälp av det näst sista steget på din polerfil.

5. Lackningsdags! Grunda med ett underlack som passar dina behov - det finns underlack för naglar som är för mjuka, hårda, fårade, gulnade.... You name it! Ett underlack fungerar som ett klister mellan nageln och det färgade lacket och känns lite "strävt" efter det har torkat. Lacka sedan önskat antal lager med ditt färgade lack. Lacka med så få drag med penseln som möjligt för att få ett så jämnt resultat som möjligt - det gör inte så mycket om första lagret lack blir lite flammigt, det jämnar ut sig i nästa lager. Avsluta med topplack för extra glans och att skydda färgen mot att mattas ner eller repas.


Lina talks about different base products for the nails


In English: Yesterday, I attended a nail course at Swedish nail polish brand Scratch nails. The course was held at Scratch nails in Stockholm for a selected crowd of beauty bloggers.
The morning started out with a yummy breakfast buffet, and then Scratch nails' CEO and founder Marie Houston told us a bit more about the brand and their history.
The first Scratch nails salon opened in 1985 in Stockholm, and in 1992 they developed their first own nail polishes - already then free from toulene, DBP and formaldehyde (3-free). Today, Scratch nails nourishing nail range is available at over 50 Swedish department stores, and the coloured polishes are available at salons and online.
The course was led by Scratch nails' educational manager, Lina Nyberg, who introduced us to the recepie for a successful at-home manicure usint the Scratch nails base manicure kit. The kit contains a crystal stone nail file, a nail polisher, an acetone and oil free polish remover, the nail oil nail food plus a clear polish.
Just as with skincare, the key to gorgeous and healty nails is good nail care with peeling and moisture. It's a bit of a process, but it's easy to do at home in a few easy steps and doesn't take as long as you might think.
1. The first step in a manicure is to remove old polish with a remover, preferrably free from acetone and oil. Acetone is a strong solvent that dries and damages the nails, and if there's oil in the remover, it encapsulates the solvant against the nail which damages the nail and can discolour the nails. Remover and oil should be applied separately, in other words!
2. Shape and seal the nail's edge with a fine nail file, preferrably a glass or crystal one since these grinds the nails instead of tearing it down like a sandpaper file does, and they will last you basically forever. With a fine nail file, you can also file small calluses around the nail and on the fingers without damaging the skin.
3. A nail polisher evens out the nail surface, provides shine and gives a good base for your polish to grip onto. A nail polisher often consists of 3 sides - 1 to even out the nail surface (do not use more than 3 times/year), and 2 to polish a shine to the nail.
4. Time for nail oil! Just as the skin, the nail needs moisture to keep its natural flexibility and elasticy. A nail oil will also keep your cuticles moisturised. The difference between a nail oil and a regular oil, like olive oil, is that the nail oil has got smaller molecules and will penetrate the nail into the bottom layers. 1-2 drops per hand is enough for all 5 nails, and the oil can be polished into the nail using the next to last step on your nail polisher.
5. Polish time! Apply a base coat suited for your needs - there are base coats for nails that are too soft, hard, ridged, yellow... You name it! A base coat works like a glue between the nail and your coloured polish and feels a bit "rough" after it has dried. Then, follow up with your desired ammount of layers of your coloured polish. Do as few strokes as possible with the brush to get an even result - it doesn't matter that much if the first layer is a bit uneven, the second layer will even that out. Finish with a top coat to provide extra shine and protect the colour to become dull or scratched.
In English: Yesterday, I attended a nail course at Swedish nail polish brand Scratch nails. The course was held at Scratch nails in Stockholm for a selected crowd of beauty bloggers. 
The morning started out with a yummy breakfast buffet, and then Scratch nails' CEO and founder Marie Houston told us a bit more about the brand and their history.

The first Scratch nails salon opened in 1985 in Stockholm, and in 1992 they developed their first own nail polishes - already then free from toulene, DBP and formaldehyde (3-free). Today, Scratch nails nourishing nail range is available at over 50 Swedish department stores, and the coloured polishes are available at salons and online.

The course was led by Scratch nails' educational manager, Lina Nyberg, who introduced us to the recepie for a successful at-home manicure usint the Scratch nails base manicure kit. The kit contains a crystal stone nail file, a nail polisher, an acetone and oil free polish remover, the nail oil nail food plus a clear polish.


Just as with skincare, the key to gorgeous and healty nails is good nail care with peeling and moisture. It's a bit of a process, but it's easy to do at home in a few easy steps and doesn't take as long as you might think.


1. The first step in a manicure is to remove old polish with a remover, preferrably free from acetone and oil. Acetone is a strong solvent that dries and damages the nails, and if there's oil in the remover, it encapsulates the solvant against the nail which damages the nail and can discolour the nails. Remover and oil should be applied separately, in other words!


2. Shape and seal the nail's edge with a fine nail file, preferrably a glass or crystal one since these grinds the nails instead of tearing it down like a sandpaper file does, and they will last you basically forever. With a fine nail file, you can also file small calluses around the nail and on the fingers without damaging the skin.


3. A nail polisher evens out the nail surface, provides shine and gives a good base for your polish to grip onto. A nail polisher often consists of 3 sides - 1 to even out the nail surface (do not use more than 3 times/year), and 2 to polish a shine to the nail.


4. Time for nail oil! Just as the skin, the nail needs moisture to keep its natural flexibility and elasticy. A nail oil will also keep your cuticles moisturised. The difference between a nail oil and a regular oil, like olive oil, is that the nail oil has got smaller molecules and will penetrate the nail into the bottom layers. 1-2 drops per hand is enough for all 5 nails, and the oil can be polished into the nail using the next to last step on your nail polisher.


5. Polish time! Apply a base coat suited for your needs - there are base coats for nails that are too soft, hard, ridged, yellow... You name it! A base coat works like a glue between the nail and your coloured polish and feels a bit "rough" after it has dried. Then, follow up with your desired ammount of layers of your coloured polish. Do as few strokes as possible with the brush to get an even result - it doesn't matter that much if the first layer is a bit uneven, the second layer will even that out. Finish with a top coat to provide extra shine and protect the colour to become dull or scratched.


Pressvisning: OPI våren/sommaren 2011


Julen har knappt börjat, men information om vårens kollektioner börjar redan dyka upp bland skönhetsmärkena. Idag presenterade OPI två av sina nya kollektioner inför våren och sommaren 2011 - Texas och Katy Perry. Texas är inspirerad av färgerna i den amerikanska sommaren, och Katy Perry-kollektionen har sångerskan själv medverkat att ta fram till släppet av sin nya skiva, Teenage Dream.


The bar at Saddle & Sable. Texas style!


Pressvisningen ägde rum på restaurang Saddle & Sable på Tegnérgatan i Stockholm, och vi var väl ett 40-tal bloggare och journalister som var på plats i den rätt så trånga lokalen. Nåja, finns det hjärterum finns det stjärterum, eller hur? =) På plats var bland annat Kicki från Daisy Beauty, Helena/Lipgloss Bitch, Kattis/Katta Kvack, Emelie/P'ssion, Tina/Beleza, Bella/Saintbella, Kristina/3Tjejer, Elina Hasslund och Anne/Nailtastic - jätteroligt att få träffa så många bekanta ansikten på en gång, jag hade jättetrevligt!


PR manager Ulrica Rygaard had the right Texas feeling going on


Det bjussades på öl, cider och plockmat till presentationen, och efter det var det fritt mingel och nagelstudio i källaren. Jag ska desvärre tillbaka till praktiken imorgon så det blev ingen manikyr för min del eftersom det ändå måste väck innan imorgon, men ett populärt val bland de som kom upp med spretande fingrar var ljusblå glass fleck-lacket I vant to be a-lone star från Texas-kollektionen.


I wish that was real money...


Kicki sporting I vant to be a-lone star with It's totally fort-worth it as an accent on her pinky


Kollektionerna lanseras under januari och februari 2011, och lacken kostar 150 kr/st.


OPI Texas collection
  • Don’t Mess With OPI – Lean, mean, kick-grass green
  • Austin-Tatious Turquoise – Bodacious blue green
  • It’s Totally Fort-Worth It – Shimmering lavender grey
  • Do You Think I’m Tex-y? – A “berry” sexy shade
  • Big Hair…Big Nails – Rosy blush
  • I Vant To Be A-Lone Star – Starry silver-blue
  • Houston We Have A Purple – Galactic violet
  • Suzi Loves Cowboys – Rich campfire chocolate
  • San Tan-tonio – The perfect honey tan
  • Too Hot Pink To Hold ‘Em – A hot pink winning hand
  • Guy Meets Gal-veston – ”Engaging” coral
  • Y’all Come Back Ya Hear? – Texan tangerine


San tan-tonio, Y'all come back ya hear?, Guy meets gal-veston, Big hair...Big nails, I vant to be a-lone star, It's totally fort-worth it


Austin-tatious turquoise, Don't mess with OPI, Too hot pink to hold 'em, Do you think I'm Tex-y?, Suzi loves cowboys


OPI Katy Perry collection
  • Last Friday Night - Sheer blue glitter
  • Not Like the Movies - Grey/green/pink duochrome
  • The One That Got Away - Magenta shimmer
  • Teenage Dream - Sheer pink glitter
  • Black Shatter - black crackle


Last friday night, Not like the movies, The one that got away, Teenage dream, Black shatter


Jag gillar att många av de varmtonade lacken i Texas-kollektionen är i jelly-finish och inte rena krämlack, kul med omväxling! Alla 12 är jättefina färger som passar både till sommaren och våren och jag tror det här är en kollektion som kommer falla många i smaken. Den absoluta favoriten ur Katy Perry-kollektionen är duokroma Not like the movies, och kul att OPI hakar på trenden med krackel-lack med!

Swatches och flaskbilder kommer imorgon och på fredag, jag kommer tyvärr inte ha tillgång till något dagsljus men jag ska göra mitt bästa för att återge färgerna så bra som möjligt!


In English: Christmas hasn't even passed yet, but information about the spring collections are already starting to appear from the beauty brands. Today, OPI presented two of their new collections for spring and summer 2011 - Texas and Katy Perry. Texas is inspired by the colours of the American summer, and the Katy Perry collection have been developed in collaboration with the singer to celebrate her new album, Teenage Dream.

The event took place at the Texas restaurant Saddle & Sable in Stockholm, and we were about 40 bloggers and journalists there in the quite small restaurant. Oh well, the more the merrier! =) I met quite a few familliar blogger faces there, I had a really great time!

We were served beer, cider and snacks during the presentation, and after that it was mingle time and nail studio in the basement. Unfortunally, I'm off to my internship at the hospital again tomorrow, so no manicure for me since I have had to take it off tonight anyway, but a popular choice among the ones that came upstairs with spread fingers was the light blue glass fleck I vant to be a-lone star from the Texas collection.

I like that many of the warm-toned Texas polishes are jellies rather than cremes, fun with some variation! All 12 are really pretty colours that are great for both summer and spring, and I think this is a collection that many people will take a fancy to. My absolute favourite from the Katy Perry collection is the duochrome Not like the movies, and It's great to see that OPI jumps on the bandwagon with a crackle polish too!


You can find shade information above. The collections will launch in January and February 2011. I'll post swatches and bottle pics tomorrow and on friday, I won't have access to any daylight though I'm afraid, but I'll do my best to represent the colours correctly!


Pressvisning: OPI Burlesque


Igår var jag på pressvisning hos OPI där dom visade sin vinterkollektion, Burlesque. Eventet ägde rum på Wallmans salonger i Stockholm, där vi bjöds på snittar, bubbel och en smygtitt på Wallmans burlesque-show utöver själva presentationen av de nya lacken.


Burlesque collection presentation


The Burlesque show


Kollektionen är inspirerad av filmen Burlesque med Cher och Christina Aguilera i huvudrollerna som har premiär i USA i november och kommer hit till Sverige i januari. Vi fick se en trailer på filmen och den verkade vara riktigt härlig och sevärd! Utöver presentationen av kollektionen fick vi även lite information om OPI's gel-manikyrer som kan göras på salong, Axxium soak-off. Gelmanikyrerna är som en blandning av gelénaglar och nagellack och håller i ca 2-3 veckor, perfekt för den som vill ha snygga naglar som håller länge! En gelémanikyr kostar från 300 kr och uppåt och är endast avsett för salongsbruk.


Axxium soak-off gels


Så tillbaka till lacken, då ;-) Burlesque-kollektionen består av 12 lack, 6 stycken skimriga och 6 stycken glittriga. Efter presentationen fick vi möjlighet att få en manikyr lagd med något av lacken. Kicki valde en ursnygg kombination av ett skimrigt och ett glittrigt guldlack, själv valde jag Tease-y does it! som är ett brunt lack med vinrött skimmer. Ursnyggt!


Kicki gets a manicure


I broke my index finger nail earlier, now I feel all lopsided! =C


Jag har hittat några nya favoriter redan bland de 12 lacken. Jag lägger upp lite flaskbilder och swatches imorgon! OPI Burlesque finns att köpa i butik från mitten av november och kostar ca 150 kr/st.


  • Let Me Entertain You – Multi-talented fuchsia mica.
  • Ali’s Big Break – This glowing red shimmer breaks through in style.
  • Tease-y Does It – In this tempting burgundy shimmer.
  • Rising Star – Lustrous glimmering gold.
  • Take the Stage – A warm orange spotlight shimmer.
  • The Show Must Go On! – With this deep pink shimmer on your nails!
  • Simmer & Shimmer – In This glittering piece of blues.
  • Show It & Glow It! – If you’ve got this fuchsia glitter, flaunt it!
  • Sparkle-icious - Multi-color glitter-iciousness
  • Bring On The Bling – A gold That glitters that’s Dazzling Beyond.
  • Glow Up Already! – You’re ready for this glittering green.
  • Extra-va-vaganza! – This orange glitter is not for the shy.


In English: Yesterday, I went to a press event at OPI where they presented their winter collection, Burlesque. The event took place at Wallmans salonger in Stockholm, and besides the presentation of the polishes, we were also served some snacks, drinks and a sneak peak preview at Wallman's burlesque show.

The collection is inspired by the movie Burlesque with Cher and Christina Aguilera in the lead roles, which premiers in the US this november and in Sweden in january. We got to see a trailer of the movie and i'm really curious about it! OPI also presented their range of gel salon manicures, Axxium soak-off. The gel manicures are like a mix of gel nails and nail polish and lasts for about 2-3 weeks, perfect for those who want long-lasting gorgeous nails! Gel manicures can only be performed at nail salons.

Back to the collection, then ;-) The Burlesque collection consists of 12 polishes, 6 shimmers and 6 glitters. After the presentation, we got the opportunity to get a manicure with any of the polishes. Kicki chose a combo of a shimmery and glittery gold polish, I chose Tease-y does it! which is a brown polish with burgundy shimmer. Gorgeous!

I'm in love with some of the polishes already. I'll post some bottle pics and swatches tomorrow! OPI Burlesque will be available for purchase in november.


5 produkter för snyggare naglar


När jag tog bort mitt gamla lack tidigare idag märkte jag vilket förskräckligt tillstånd mina naglar och nagelband befann sig i - händerna och naglarna tar verkligen stryk av vinterkylan! Problemet var snabbt åtgärdat däremot, tack vare några få produkter som snabbt får mina naglar att se fräscha och snygga ut igen:


1. Glasfil -
En glasfil kostar några kronor mer än en vanlig fil i papper, men å andra sidan så ger den betydligt bättre resultat, är snällare mot naglarna och nöts i princip aldrig ut. Jag filar mina naglar med filen vinklad aningen underifrån för att förhindra att naglarna skivar sig. Den glasfil jag använder kommer från Depend och kostar 70 kr.

2. Polerblock - Jag är nog inte ensam om att ha naglar som blir "räfflade" och ojämna i strukturen, vissa naglar på längden och andra på bredden. Räfflorna kan bero på stress, näringsbrist och uttorkning bland annat, och de gör att naglarna ser matta och slitna ut. Ett polerblock med flera sidor hjälper till att jämna ut räfflorna så att du får jämna, släta och blanka naglar - var noga med att inte använda det för ofta däremot, för då kan naglarna försvagas och går av lättare. Det finns många olika varianter av polerblock, bland Flash Shiner som finns att köpa annat hos Trans design för ynka $1.46/st.

3. Nagelolja - Sköra naglar som skivar sig beror oftast på uttorkning, proteinbrist och/eller mineralbrist. Nageln består av flera tunna lager av plattor, och en nagelolja återfuktar naglarna och hjälper till att "limma ihop" plattorna med varandra så att naglarna inte skivar sig lika lätt. Själv använder jag arganolja (en närande olja för hela kroppen) som min pappa har köpt åt mig i Marocko, något som är väldigt dyrt i Sverige har jag märkt. Ett bra och billigare alternativ är China Glaze Orange cuticle oil, 99 kr hos Eleven.se.

4. Handkräm - Ett måste för mig i vintertider är en bra och återfuktande handkräm som komplement till nageloljan. En handkräm återfuktar både händer, nagelband och naglar och gör händerna snygga på nolltid! Min favoritkräm är en budgetvariant från brittiska varuhuset Marks & Spencer, där den kostar blygsamma £1 och finns i flera olika varianter och dofter, men tyvärr finns den inte att köpa här i Sverige. En annan favorit är Creatives Scentsations Hand & Body lotion med doft av mango och kokosnöt, och den finns att köpa i tre olika storlekar hos Nails, Body & Beauty från 60 kr.

5. Underlack och överlack - Om du, som jag, använder nagellack väldigt ofta är ett bra underlack och ett överlack ett måste för att hålla lacket på plats och skydda nageln från missfärgning. Jag är väldigt förtjust i under-och överlacken från Seche; Seche Clear är ett fantastiskt underlack som håller annat lack på plats och förhindrar att nageln missfärgas, och Seche Vite är ett snabbtorkande, högglansigt överlack som gör lacket yttort på någon minut och helt härdat på ca 20 minuter. Jag köper mina Seche-lack hos Trans design, där de kostar $3.20 respektive $4.20/st.


In English:
When I removed my old polish earlier today I noticed that my nails and cuticles looked horrible underneath - the cold weather really hits hard against the hands and nails! My problem was corrected easily though, thanks to a few products that makes my nails look fresh and neat again in an instant:


1. Glass file -
A glass file is a bit more expensive than a regular paper file, but on the other hand it provides better results, are more gentle to the nails and it lasts forever. I file my nails in a 45 degree downwards angle to prevent the nails from peeling. The file I use comes from Depend and costs 70 SEK.

2. Buffer block - I'm probably not the only one having problems with nails with ridges. These can be caused by many reasons, like stress, malnutrition and dehydration, and they make the nails look matte and worn. A buffer block helps even out the ridges so that your nails become even and shiny - make sure not to use it too often though, since it can weaken the nails. There are many different kinds of buffer blocks, like the Flash Shiner which is available at Trans design among others for only $1.46 each.

3. Cuticle oil - Brittle nails that peel are most commonly caused by dehydration, protein deficiency and/or mineral deficiencies. The nail consist of several thin layers of nail plates, and a cuticle oil helps with rehydrating the nails and "glue" the plates together to prevent peeling. I use argan oil (a nourishing oil for the entire body) that my dad has bought for me in Marocko, this oil is very expensive here in Sweden though. A good budget alternative is China Glaze Orange cuticle oil, $3.16 at Trans design.

4. Hand creme - A good and moisturising hand creme is a must for me during winter. A hand creme moisturises both the hands, cuticles and nails and makes your hands look great in an instant! My favourite comes from british warehouse Marks & Spencer, where it only costs £1 and comes in many different varieties. Another favourite is Mango & Coconut Scentsations Hand & Body lotion from Creative, available in three different sizes at Head 2 Toe from $1.75 per bottle.

5. Base coat and top coat - If you, like me, use nailpolish often, it's important to use a good base and top coats to keep the polish in place and prevent the nails from staining. I'm very fond of the base/top coats from Seche; Seche Clear is a great base coat that keeps the polish in place and prevents the nail from staining, and Seche Vite is a high-gloss fast dry topcoat that dries the surface of the polish in a minute, and hardenes it in about 20 minutes. I buy my Seche polishes at Trans design, where they cost $3.20 and $4.20 respectively.


Nagellackshjul


Nu börjar min lacksamling (som för bara 1½ år sedan bestod av ynka 3 lack) växa till sig ordentligt, jag räknade lacken häromdagen och fick det till hela 68(!) lack, plus diverse över/underlack och konadlack. Galet vad fort samlingen har vuxit! Det börjar bli lite svårt att få översikt över vad man faktiskt har i gömmorna nu, så jag klickade hem några nagellackshjul från eBay i förra veckan, och igår kom dom =) 4 kr/st inklusive frakt betalade jag för hjulen.

Gårdagen spenderades alltså med att swatcha nagellack för fullt, varvat med att vädra ur hela huset med iskall vinterluft så jag och katterna inte skulle tuppa av av alla ångorna =P Jag blev riktigt nöjd med resultatet i alla fall! Det svart/vit-randiga hjulet är swatches på konadstämpellack och andra lack som är bra att stämpla med, stämplade på både svart och vitt underlag =) Ordentliga närbilder på alla hjul i bra ljus kommer så småningom!


In English: My nail polish collection (that consisted of only 3 polishes 1½ years ago) is starting to grow into a decent size, I counted them all the other day to 68(!) bottles, plus base/top coats and konad special polishes. It's crazy how fast the collection has grown! I'm in need of some sort of overview of the collection, so I ordered some nail polish wheels from eBay last week, and they arrived yesterday =) I paid 4 SEK each (about 50 cents) for the wheels, including shipping.

So, I spent yesterday afternoon with swatching polishes and air the house with icy cold winter air from outside so that me or my cats wouldn't pass out from the fumes =P I'm really pleased with the results! The black/white wheel is swatches of konad special polishes and other polishes suitable for stamping, stamped on both black and white bases =) I'll shoot some close-ups of all the wheels in good lighting condition as soon as possible!


Nya Konadplattor!


Som ni kanske vet så är jag väldigt förtjust i att dekorera naglarna med Konads stämplingsteknik - mer om hur man gör kan ni läsa här. På Konads koreanska hemsida har det nyligen kommit upp 9 nya bildplattor som tydligen snart landar här för oss i väst med! Jag hade dock velat se fler heltäckande mönster, men jag väntar med spänning på att dessa ska komma in till OC Nail Art så jag kan klicka hem platta M76 och M78!


In English: As you might have noticed, I love decorating my nails with the Konad stamping technique - you can read more about how to do this here. At Konad's korean website, they have recently added 9 new image plates to the range that will be available over here shortly aswell! I must admit that I was a bit dissapointed not to see more full patterns, but I'm really looking forward to see them at OC Nail Art so that I can order image plate M76 and M78!


Image credit: Konad.co.kr


Nagellack - swatches och färgjämförelser


Igår kväll roade jag med att måla swatches med alla mina vanliga nagellack (dvs de som inte är stämpellack, underlack eller överlack) på lösnaglar som jag fått av misstag när jag beställde rhinestones till naglarna på ebay. Vissa lack är ju svåra att se hur de kommer se ut på nageln i flaskan, och det är lättare att både få en översikt över vilka lack man har så det inte blir några dupe-köp, och för att bestämma sig för vilken färg man ska lacka naglarna med härnäst =)

Jag tänkte att ni kanske var intresserade av att se mina swatch-naglar ni med, eftersom jag själv tycker det underlättar något enormt att se hur lacken ser ut på en nagel och bredvid en annan liknande färg när jag ska beställa nya! De flesta lacken är 2 lager, några är 3 lager, och glitterlacken har ett eller två lager överlack för att jämna ut ytan.


China Glaze 2030, MAC Mercenary, OPI Need sunglasses?, China Glaze Breakin', China Glaze Style wars, OPI Give me a coral sometime


China Glaze Sneaker Head, OPI Vodka & caviar, Zoya Alix, Mavala New Dehli, China Glaze Ruby pumps, Viva la Diva #10


OPI Koala bear-y, Mavala Freshy, China Glaze Laced up, OPI La paz-itively hot matte, China Glaze Limbo bimbo


Mavala Graphic, Colour Club Vintage cotoure, Depend #156, Mavala Riga, China Glaze Sensous


Zoya Demi, China Glaze Flying dragon, China Glaze Coconut kiss, Mavala Mexico, Depend #115


OPI Russian navy matte, China Glaze Calypso blue, China Glaze meteor shower, Essie Mesmerize


Depend #1008, China Glaze Carribean blue, Depend #132, China Glaze For Audrey, China Glaze Custom kicks


MAC Peppermint patti, China Glaze Watermelon rind, China Glaze Emerald sparkle, Zoya Midori, China Glaze Entourage, China Glaze L8R G8R


China Glaze White on white, China Glaze OMG, China Glaze Milennium, MAC On the prowl, China Glaze Recycle, ManGlaze Fuggen uggly, ManGlaze The death tar, China Glaze liquid leather


In English: I spent yesterday evening with swatching all my regular nail polishes (i.e. the ones that aren't special stamping polishes, top coats or base coats) on false nails that I got sent to me by mistake when ordering rhinestones from a seller on ebay. Some polishes are hard to see how they will look on the nails by just looking at the bottle, and it's easier both to get an overview over what polishes that you have so that you don't buy any dupes, and to decide what colour to put on the nails next =)

I thought that you guys might be interested in seeing my swatch nails aswell, since I myself find it very helpful to see the polishes painted on a nail and next to another similar colour when I'm ordering new ones! Most polishes are 2 coats, some are 3 coats, and the glitter polishes have one or two coats of top coat to even out the surface.


All about matta naglar


Den stora trenden inom nagellacksvärlden just nu är matta lack. Först ut var ManGlaze med sina två matta lack som främst riktar sig till män. De stora märkena är inte sena att haka på trenden, och under sommaren och hösten kommer OPI, Zoya, Orly och Essie ut med matta produkter för naglarna.


1. OPI Matte Collection - OPI lanserar 6 av deras mest populära nyanser i en matt version; Gargantuan Green Grape, Alpine Snow, Russian Navy, Lincoln Park After Dark, You Don't Know Jacques och La Paz-itively Hot. När jag säger matt menar jag verkligen matt, dessa lack är verkligen totalt platta och har inte en enda skimmerpartikel eller minsta antydan till glans. Swatches kan ni se hos Scrangie. Jag föll som en fura för La Paz-itively Hot i Rosa och klickade just hem en flaska för 149 kr (fraktfritt!) hos den svenska webbshopen Nails Body & Beauty.
2. Zoya Matte Velvet Collection - Zoya lanserar en minikollektion med halvmatta lack med nästan en sammetskänsla, som namnet på kollektionen antyder. Lacken som släpps är Dovima i svart, Loredana i grått och Posh i vinrött. Scrangie ger oss superfina swatches här med, med lacken både som matta och med blankt överlack över. Vad jag har märkt så är Zoya lite halvknepigt att få tag på från Sverige, så om någon har ett tips på en bra webbshop som skickar hit så mottages det tacksamt! Matte Velvet-lacken går på $6 från deras egna hemsida.
3. ManGlaze - Märket som var före sin tid med de matta lacken, skapade med speciellt män i åtanke. ManGlaze finns i två nyanser, Fuggen Ugly i grått och The Death Tar i svart. ManGlaze-lacken kan du köpa på deras egna hemsida, där de kostar $6.66 styck + frakt.
4. Essie Matte about you - Essie lanserar ett matt överlack till sensommaren/hösten som heter Matte about you. Med ett matt överlack kan du göra alla dina lack matta vilket är betydligt mer praktiskt och ekonomiskt än att köpa flera matta lack. Scrangie swatchade Matte about you idag och det ser onekligen lovande ut! Jag längtar tills det släpps i augusti. Matte about you kommer kosta $10 och jag antar att det svenska priset kommer hamna någonstans strax över hundralappen.
5. Orly Matte Cotoure - Orly hakar även de på den matta trenden till hösten. I september kan vi köpa Blue Suede i blått, Vinyl i Svart och Purple Velvet i vinrött och kommer kosta $7.50.


In English: The big nail trend right now is matte, matte, matte. ManGlaze was first out, and the big brands aren't lateto jump on the bandwagon. OPI, Zoya, Orly and Essie launches matte nail products this summer and fall.

1. OPI Matte Collection - OPI launches 6 of their most popular shades in a matte finish this summer; Gargantuan Green Grape, Alpine Snow, Russian Navy, Lincoln Park After Dark, You Don't Know Jacques and La Paz-itively Hot. When I say these are matte, I mean matte! There are no shimmer or shine what so ever, these are completely flat! Scrangie has made some awesome swatches of these. I just bought a bottle of La Paz-itively Hot from a Swedish web shop for 149 SEK.
2. Zoya Matte velvet collection - Zoya launches a mini collection consisting of three velvet matte polishes; Dovima in black, Loredana in grey and Posh in burgundy. Scrangie shows us swatches on how these polishes looks both matte and with a shiny top coat. These retail at $6 at Zoya.com.
3. ManGlaze - The original matte nail polish, originally formulated for men. ManGlaze comes in two shades, Fuggen Ugly in grey and The Death Tar in black. You can buy ManGlaze directly from their own website at $6.66 each + s/h.
4. Essie Matte about you - Essie launches a matte top coat in august, perfect if you want the matte polish look but don't want to buy lots of new polishes. Scrangie swatched matte about you today and it looks promising! This will retail at $10.
5. Orly Matte Cotoure - Orly releases three matte polishes this fall. In September we can buy Blue Suede in blue, Vinyl in black and Purple Velvet in burgundy. These will retail at $7.50.


Nail bullion beads


Nail bullion beads kallas dessa mikroskopiska pärlor för nageldekoration. Jag beställde hem ett hjul med 12 olika färger på ebay och det kom idag, så självklart var jag tvungen att leka lite =) Har inte orkat sminka mig idag nämligen men något måste väl en beautynörd roa sig med på sin lediga dag? ;-)


Jag fäste pärlorna genom att trycka fast dom en och en med en tandpetare (för att plocka upp pärlorna på tandpetaren slickade jag helt enkelt lätt lätt på tandpetarspetsen) i det fuktiga nagellacket. Pillepill med andra ord, men resultatet blir jättefint! Gjorde tre olika motiv idag. För att pärlorna ska sitta på plats bör man fixera med ett genomskinligt topplack, vilket jag inte har gjort.


ManGlaze fuggen uggly och China Glaze liquid leather med bullion beads i silver längs skarven. Enkelt men effektfullt!


Mavala graphic som bas, bullion beads i guld och rött. Somrigt och sött!


Unfortunately, no one can be told what The Matrix is... China Glaze liquid leather som bas med gröna bullion beads


De tre designerna tillsammans =) Min stackars sargade långfingernagel som jag bröt på jobbet igår... Hoppas den växer ut igen snabbt!


In English:
Nail bullion beads are tiny, tiny beads used for nail art. I ordered a wheel with 12 different colours from ebay a while ago, and it arrived here today so I just had to play with them =) I'm not wearing any makeup today so I have to occupy myself with something else on my day off! I applied the beads by pressing them onto the nail polish while it was still tacky, using a toothpick. A lot of detail work, but it's really fun and easy! To make sure that the beads stay put, you should use a top coat when you're done with your design, something I haven't done here. For the first design, I used ManGlaze fuggen ugly in matte grey with China Glaze liquid leather diagonally over the nail, and put silver bullion beads where the two colours meet. For the second design, I used Mavala graphic as a base with bullion beads in gold and red to make tiny flowers. Lastly, for the third design, I used China Glaze liquid leather as a base with green bullion beads, inspired by The Matrix =) I broke my middle finger nail at work yesterday, it's painfully short. I hope it will grow out again fast!


Blog Widget by LinkWithin

    Purity är en skönhetsblogg som har funnits på nätet sedan hösten 2008. Jag som driver bloggen heter Sanna, är 23 år och bor i Stockholm. Läs mer här!

bloglovin


RSS 2.0
Purity är en blogg som drivs i privat ägo. Omdöme och betyg av produkter som förekommer på denna blogg är mina egna åsikter och går ej att påverka. Läs mer om min policy här.

Purity is a privately owned beauty blog. The opinion and rating of products that occurs on this blog are my own views and cannot be affected. Read more about my policies here.


© 2008-2011 purity.webblogg.se About Purity | Contact | Policy